
dokku on Ubuntu VM - Part 1: Setting up the VM
Outdated. Find more up-to-date version in this newer article .
My notes in walking along the dokku path.
(Not only) the rails community is going all excited about playing around with docker instead of with full-blown virtual machines.
With dokku and its fork dokku-alt a (or count two and of course there are many others) project aims to build a thin but super-soft layer between the containers (if you don’t know them yet: think of them as virtual machines) and your deployment-fu.
These tools scratch itches of mine: deployment for me is less fun than doing other stuff with a computer. But slim tools usually are quite fun. And I like heroku-style git-push-deploys.
So, lets get a dokku-thing up and running.
Aim
- Set up a dokku guest that we can deploy a rails 4 app to.
- Run this dokku guest on a server in the wild.
- Let this dokku guest serve our app to the outside world.
###Requirements
- Ubuntu 14.04 system
- A bit of patience, as initial setup requires some data to be downloaded (you can speed this up by using local repositories)
- DNS set up to resolve your domain
Instead of spoiling my main system with other package installations, configurations and tasks, I will create a virtual machine running ubuntu to be my docker/dokku host. I will call that machine vlaada and it will be a minimal Ubuntu 14.04 (trusty) system. To be on the safe side, I will not create the VM by hand or with any mind-blowing creatures like puppet or chef, but use vmbuilder (apt-get install python-vm-builder). Note that while I use kvm and libvirt here you can use other hypervisors.
#!/bin/bash
# Build base vm (kvm, libvirt) to use with dokku
# Felix Wolfsteller, 2015, GPL3+
sudo vmbuilder\
  kvm\
  ubuntu\
  --suite trusty\
  --flavour virtual\
  --arch amd64\
  --name vlaada\
  --hostname vlaada\
  --mem 1024\
  --cpus 1\
  --rootsize 20480\
  --swapsize 2048\
  --addpkg apparmor\
  --addpkg linux-image-generic\
  --addpkg openssh-server\
  --addpkg postgresql-client\
  --addpkg acpid\
  --user dokkulord\
  --ssh-user-key=/home/you/.ssh/id_rsa.pub\
  --lock-user\
  --timezone Europe/Berlin\
  --libvirt qemu://system\
  --verbose\
  --execscript `pwd`/setup-vlaada
Some options require special attention:
addpkg linux-image-generic: vmbuilder (?) bug workaround (you might not need it)addpkg acpid: allows us to shut the machine down cleanly without logging inaddpkg apparmor: another workaround, otherwise docker/dokku won’t play nice with us (again, ymmv)addpkg postgresql-client: will need this later to make postgresql database dumps, the dokku postgresql plugin won’t install this package for ususerandssh-user-key: locks the machine down (a bit), use the public key with which you want to log into the system later--execscript ...: assemble path to the setup-vlaada- script (see below); it is executed at the end of the build process
The content of setup-vlaada-script:
#!/bin/bash
# Prepare a bare ubuntu VM for simple dokku installation
# Felix Wolfsteller, 2015, GPL3+

# called from vmbuilder, first argument is path to chroot us.

echo "Enable passwordless sudo for admins"
echo '# Allow members of group admin to not need a password' >> $1/etc/sudoers
echo '%admin ALL=NOPASSWD: ALL' >> $1/etc/sudoers

echo "Enable (passwordless) sudo for dokku"
echo '# Allow members of group dokku to not need a password' >> $1/etc/sudoers
echo '%dokku ALL=(ALL:ALL) ALL' >> $1/etc/sudoers
echo '%dokku ALL=NOPASSWD: ALL' >> $1/etc/sudoers
If that looks scary to you, it is. It basically allows the dokku and dokkulord users to sudo without password.
On my favorite machine, this vm-creation-process takes around 20 minutes. On my development machine with ecovillage-internet multiply this by 3.
If you are impatient when no white letters run over your black screen, the command above will tell you where to sudo tail -f to to see what is happening ( .... logging to file: /tmp/tmpXXXXYYYZZZ).
vmbuilder will then provide us with a qcow image in the subfolder ubuntu-kvm. Now might be a good time to clone this machine, e.g. using
virt-clone --auto-clone -o vlaada --prompt (apt-get install virtinst to get virt-clone, this only applies to the libvirt setting I use).
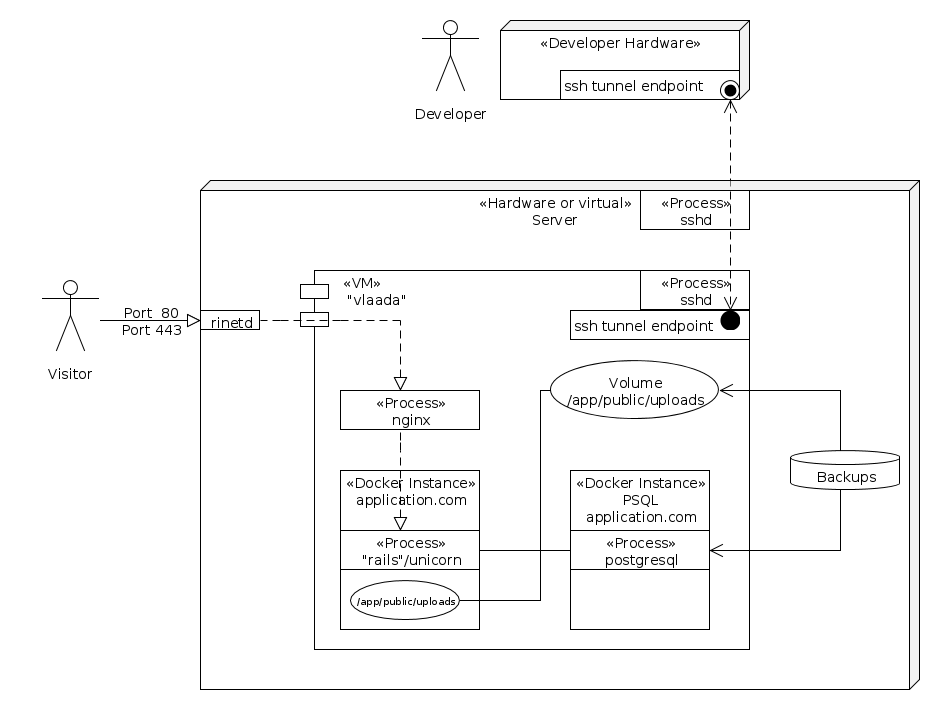
Configuring access to the dokku VM
vlaada (the dokku VM) lives on a server in the wild and it shall not be accessible from outside (except for ports 80 and 443). To access it, I will dig an ssh tunnel through the server.
In my ~/.ssh/config I put
# ~/.ssh/config
vlaada-tunnel
  User felix-on-server
  Hostname myserver.com
  LocalForward 7722 192.168.122.77:22
vlaada
  User dokkulord
  Port 7722
Calling ssh vlaada-tunnel makes connections to the localhosts port 7722 end up at port 22 on the vm that we have set up (here, referenced by its IP 192.168.122.77).
I also add an host entry
# /etc/hosts
127.0.0.1 vlaada
Test that
Now after digging the tunnel (ssh vlaada-tunnel) I am able to ssh vlaada into the dokku machine, which is somewhere out there, hidden in the wild. Cool.
Next steps
That’s how happy we will get today. I hope to upgrade this post with some better prose and deliver part II, where we add dokku-juice to the mix. Have fun.
Notes
In the vmbuilder step you might find following options helpful:
--mirror http://your-apt-mirror-cache-or-proxyThis might save you some time and network traffic.
Having a better idea?
Awesome! Get in contact with me!