
dokku on Ubuntu VM - Part 2: Configure and use dokku
Outdated. Find more up-to-date version in this newer article .
My notes in walking along the dokku path.
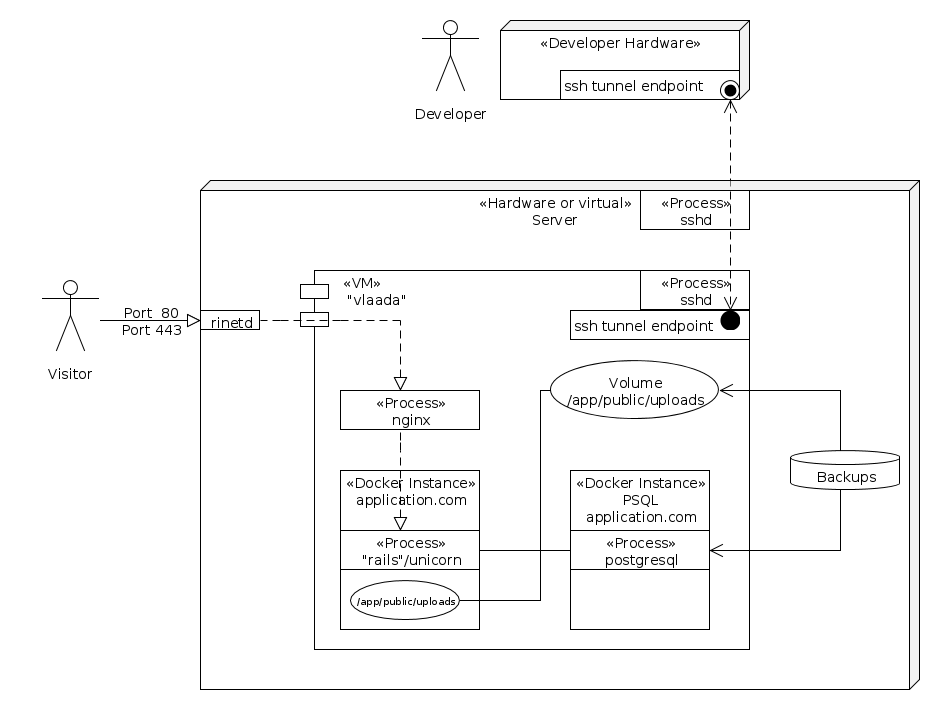
With the VM setup from part I we go on and install dokku, to end up with something like in the diagram above, one day.
Dokku installation
Whether through the tunnel or other means (e.g. VNC) Start the guest and ssh into it (you provided a key, so it should work passwordless). Then, fire up the dokku installation:
dookulord@vlaada:~$ wget -qO- https://raw.github.com/progrium/dokku/v0.3.17/bootstrap.sh | sudo DOKKU_TAG=v0.3.17 bash
This process will take another 5 minutes.
Next, install your public key and make it gain you superpowers when logging in as dokku (or git pushing):
(run this from your development machine or server, depending on your setup)
$ cat ~/.ssh/id_rsa.pub | ssh vlaada "sudo sshcommand acl-add dokku $USER"If this fails, you missed the sudo-stuff from earlier on (it would fail with “sudo: no tty present and no askpass…”).
Test
In principle with that, you are ready to go.
To test, we will not yet deploy a rails app, but the modified heroku sinatra example (on your dev machine):
$ git clone git@github.com:rchrd2/dokku-ruby-example.git
$ cd dokku-ruby-sample
$ bundle
$ git remote add dokku dokku@vlaada:ruby-sample
$ git push dokku master
This might take a minute or two and you should see these final lines:
=====> Application deployed:
       http://ruby-sample.vlaada

To dokku@vlaada:ruby-sample
 * [new branch]      master -> master
Awesome.
Enter the dokku ‘client’
To control vlaadas working as dokku-master, we have to log in as user dokku. Therefore, another entry in ~/.ssh/config comes handy:
# ~/.ssh/config
# ... snip ...
Host dokku-vlaada
  User dokku
  Hostname vlaada
  Port 7722
This makes it possible to ssh dokku-vlaada - it will list all the possible dokku commands (assuming the tunnel is digged).
You can further shorten this by placing an alias in your ~/.bash_aliases (although you use zsh): alias dokku-vlaada='ssh dokku-vlaada'.
Call dokku-vlaada apps to see the apps you installed (it should list ruby-sample).
Exposing dokkus nginx
Now that the dokku guest is running, you want to expose ports 80 (http) and 443 (https).
A low-level tool to achieve that is rinetd (apt-get install rinetd).
Edit /etc/rinetd.conf like following (replace the 192.168.122.77 by the IP of your dokku guest).
# /etc/rinetd.conf
# ...snip..
#
# forwarding rules come here
#
# you may specify allow and deny rules after a specific forwarding rule
# to apply to only that forwarding rule
#
# bindadress    bindport  connectaddress  connectport
0.0.0.0 80 192.168.122.77 80
0.0.0.0 443 192.168.122.77 443
# Good idea: document what you have done, redudantly
# Felix added 80 and 443 redirects 2015-05-01
# ...snip..
Afterwards, do not forget to restart rinetd:
service rinetd restart
Next steps
After validating that your dokku serves you, visit ruby-sample.yourdomain.tld and relax. Afterwards, you probably want to install some dokku-plugins and ride a real rails app, setup ssl, backups and stuff. Lets see when I can get this covered in a blog post.
Having a better idea?
Awesome! Get in contact with me!