
dokku on Ubuntu VM - complete with Rails
Simple tools are beatiful
This is a revised version of two earlier outdated posts of mine.
(Not only) the rails community is going all excited about playing around with docker containers instead of with full-blown virtual machines.
With dokku a (and there are many others) project aims to build a thin but super-soft layer between the containers (if you don’t know the difference yet: think of containers as if they were virtual machines for now) and your deployment-fu.
These tools scratch itches of mine: deployment for me is less fun than doing other stuff with a computer. But slim tools usually are quite fun. And heroku-style git-push-deployments can be really enjoyable.
Aim
- Set up a dokku guest that we can deploy a rails 4 app to.
- Run this dokku guest on a server in the wild.
- Let this dokku guest serve our app to the outside world.
- Have it make use of letsencrypt.
- Have a basic idea of how to backup your db and/or uploads.
Requirements
- Ubuntu 14.04 system
- A bit of patience
- DNS set up to resolve your domain
Step one: create the VM
Instead of spoiling my main system with other package installations, configurations and tasks, I will create a virtual machine running ubuntu to be my docker/dokku host. I will call that machine vlaada and it will be a minimal Ubuntu 14.04 (trusty) system. To be on the safe side, I will not create the VM by hand and will not use any heavy machinery like puppet or chef, but use vmbuilder (apt-get install python-vm-builder). Note that while I use kvm and libvirt here you can use other hypervisors.
To ease creation of the VM, I put the somewhat long commands in (ba)sh scripts:
#!/bin/bash

# setup_dokku_vm.sh <vmname>

# Build base vm (kvm, libvirt) based on Ubuntu 14.04 minimal to use with dokku
# Felix Wolfsteller, 2015, 2016 GPL3+

if [ -z "$1" ]
  then
    echo "No argument supplied, call like '$0 <vm-name>'."
    exit 1
fi

VMNAME="$1"
USERHOME="$HOME"

sudo vmbuilder\
  kvm\
  ubuntu\
  --suite trusty\
  --flavour virtual\
  --arch amd64\
  --name "$VMNAME"\
  --hostname "$VMNAME"\
  --mem 1024\
  --cpus 1\
  --rootsize 20480\
  --swapsize 2048\
  --addpkg apparmor\
  --addpkg linux-image-generic\
  --addpkg openssh-server\
  --addpkg postgresql-client\
  --addpkg acpid\
  --user dokkulord\
  --ssh-user-key="$USERHOME"/.ssh/id_rsa.pub\
  --lock-user\
  --timezone Europe/Berlin\
  --libvirt qemu:///system\
  --verbose\
  --execscript `pwd`/post_setup
Some options require special attention:
addpkg linux-image-generic: vmbuilder (?) bug workaround (you might not need it)addpkg acpid: allows us to shut the machine down cleanly without logging inaddpkg apparmor: another workaround, otherwise docker/dokku won’t play nice with us (again, ymmv)addpkg postgresql-client: will need this later to make postgresql database dumps, the dokku postgresql plugin won’t install this package for ususerandssh-user-key: locks the machine down (a bit), use the public key with which you want to log into the system later--execscript ...: assemble path to thepost_setupscript (see below); it is executed at the end of the build process
The content of post-setup-script:
#!/bin/bash

# Prepare a bare ubuntu VM for simple dokku installation, not unscary
# Felix Wolfsteller, 2015, 2016 GPL3+

# called from vmbuilder, first argument is path to chroot us.

echo "Enable passwordless sudo for admins"
echo '# Allow members of group admin to not need a password' >> $1/etc/sudoers
echo '%admin ALL=NOPASSWD: ALL' >> $1/etc/sudoers

echo "Enable (passwordless) sudo for dokku"
echo '# Allow members of group dokku to not need a password' >> $1/etc/sudoers
echo '%dokku ALL=(ALL:ALL) ALL' >> $1/etc/sudoers
echo '%dokku ALL=NOPASSWD: ALL' >> $1/etc/sudoers

wget https://raw.githubusercontent.com/dokku/dokku/v0.5.4/bootstrap.sh
sudo DOKKU_TAG=v0.5.4 bash bootstrap.sh
If that last part looks scary to you, it is. It basically allows the dokku and dokkulord users to sudo without password.
Now, calling setup_dokku_vm vlaada will create and register a virtual machine.
On my favorite machine, this vm-creation-process takes around 20 minutes.
If you are impatient and want to see some white letters run over your black screen, the command above will tell you where to sudo tail -f to to see what is happening ( .... logging to file: /tmp/tmpXXXXYYYZZZ). On inspection you will see that no magic happens.
If you use virt-manager you can now easily connect to the VM host and see that vlaada has been created and registered. It’s ready to start!
Now might be a good time to clone this machine, e.g. using virt-clone --auto-clone -o vlaada --prompt (apt-get install virtinst to get virt-clone, this only applies to the libvirt setting I use).
Install dokku
This already happened in the post_setup script!
Login via ssh
As your key is already registered you can now login to the machine via ssh (you can also connect with virt-manager if you want - even remotely!).
Make your ssh-keys known or passed around where necessary.
To find the IP of your virtual machine (if its dhcped like in my setup) you can look at the current dhcp-leases with cat /var/lib/libvirt/dnsmasq/default.leases.
Assuming the IP is 192.168.122.177 you ssh dokkulord@192.168.122.177 into the machine to administrative tasks and ssh dokku@192.168.122.177 to run dokku commands.
Everything works? Great, lets make this fun possible at home!
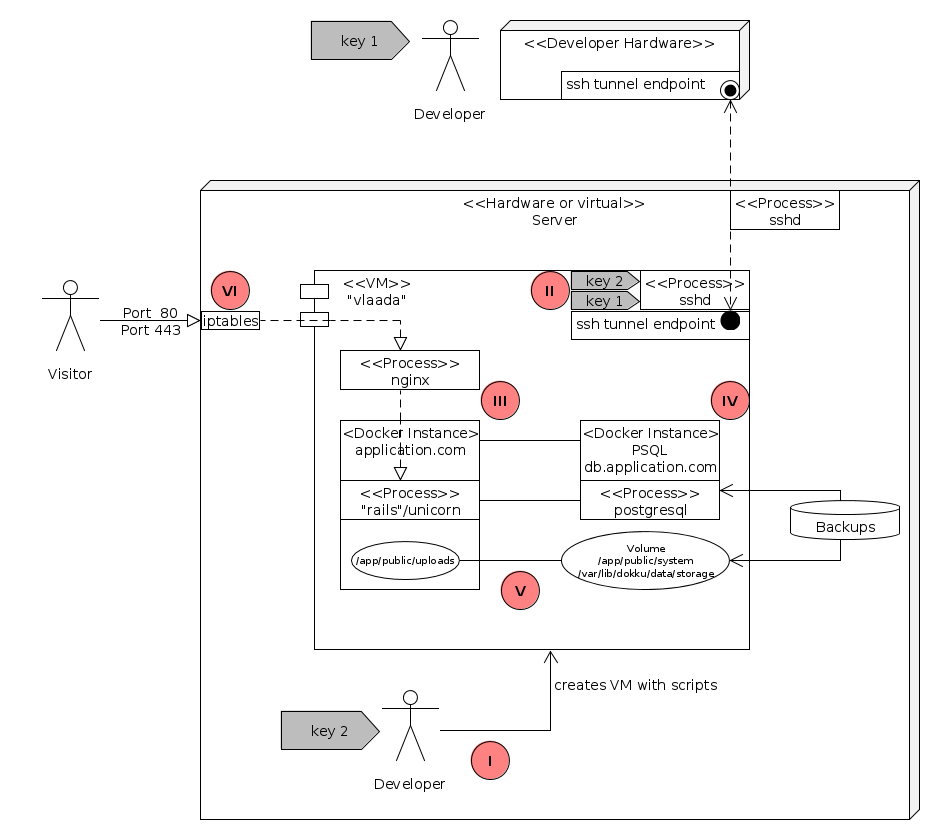
Step 2: Configuring access to the dokku VM
vlaada (the dokku VM) lives on a server in the wild and it shall not be accessible from outside (except for ports 80 and 443). To access it, I will dig an ssh tunnel through the server.
In my ~/.ssh/config I put
# ~/.ssh/config
vlaada-tunnel
  User felix-on-server
  Hostname myserver.com
  LocalForward 7722 192.168.122.177:22
vlaada
  User dokkulord
  Host localhost
  Port 7722
dokku-vlaada
  User dokku
  Host localhost
  Port 7722
Calling ssh vlaada-tunnel makes connections to the localhosts port 7722 end up at port 22 on the VM that we have set up (here, referenced by its IP 192.168.122.177).
I also add an host entry
# /etc/hosts
127.0.0.1 vlaada
Test that
Now after digging the tunnel (ssh vlaada-tunnel) I am able to ssh vlaada into the dokku machine, which is somewhere out there, hidden in the wild. Cool.
Given that I authorized my key to perform dokku stuff ssh dokku-vlaada will run dokku commands on vlaada.
You can configure dokku by digging a tunnel to port 80 (ssh -L 8099:192.168.122.177:80 myhost) and visiting it (http://localhost:8099 in that example) with a webbrowser. This will especially set the /home/dokku/VHOST file content if using vhosts (which I do).
Create an alias
Now you can create an [alias (with nalias)][alias] to run dokku commands:
alias dokku-vlaada='ssh dokku@vlaada'
Alternatively in following examples you can run dokku as dokkulord from 192.168.122.177 yourself (sudo dokku <command>) or “spell it out” ssh dokku@vlaada <command>. For the latter (and the alias) the tunnel has to be dug first.
Configure http(s) forwarding/NAT
To expose port 80 and port 443 of your virtual machine to the internets you want to NAt these ports (e.g. using iptables).
“Integration”-Test this
Lets deploy a toy app
$ git clone git@github.com:rchrd2/dokku-ruby-example.git
$ cd dokku-ruby-example
$ bundle
$ git remote add dokku dokku@vlaada:ruby-sample
$ git push dokku master
Afterward just a few minutes, ruby-sample.myhost should be available (watch STDOUT). Brilliant!
Install postgres plugin
SQLite databases won’t work out of the box, so pick an app which uses postgresql in production configuration and install the postgres plugin (you only have to do this once):
dokku-vlaada plugin:install https://github.com/dokku/dokku-postgres.git
Create a postgresql database
I use db.<appname> as a name for the database.
dokku-vlaada postgres:create db.myapp
Create the app
dokku-vlaada apps:create myapp
And link it
dokku-vlaada postgres:link db.myapp myapp
Now add the remote to your rails app, e.g.
git remote add dokku dokku@vlaada:myapp .
And push it
git push dokku master
Setup DB, run the migrations
dokku-vlaada run myapp rake db:setup
Backup your database
dokku-vlaada postgres:export db.myapp > myapp.db.pgdump
Add some storage
If your app handles file uploads or any other data that should be persisted you will be happy to use the storage plugin.
Let us encrypt
With letsencrypt we have serious automated ssl certificates at hand for free and dokku has a plugin (in beta stage) for you.
Enter the awesomeness by installing the plugin
dokku-vlaada plugin:install https://github.com/dokku/dokku-letsencrypt.git
That was simple.
Installing a certificate is much more complicated:
dokku-vlaada config:set --no-restart myapp DOKKU_LETSENCRYPT_EMAIL=your.mail@your.host
dokku-vlaada letsencrypt myapp
That was tough, but now you have deployed a valid, trusted certificate and configured your nginx to use it. Please read the letsencrypt plugins README, as it also has some legal stuff on it.
Notes
In the vmbuilder step you might find following options helpful:
--mirror http://your-apt-mirror-cache-or-proxyThis might save you some time and network traffic.- You can checkout the scripts at http://github.com/fwolfst/scripts/setup_dokku_vm .
- To have the app logging to stdout and seeing the logs via
dokku logs myappthe easiest way is to include therails_12factorgem in your Gemfile.
Having a better idea?
Awesome! Get in contact with me!